SwiftでiOSアプリを開発していると、画面遷移と値の受け渡しに無茶苦茶苦戦します。Androidだとあんなに簡単なのに。。。と度々絶望する日々。
と言うことで、色んなパターンの画面遷移方法をまとめておきました。ソースもgithub上にありますのでご活用ください。
Swift: 4.0.3
Xcode: 9.2
iOS: 11.2
ソース:
https://github.com/yheihei/ios/tree/master/MoveViewTutorial
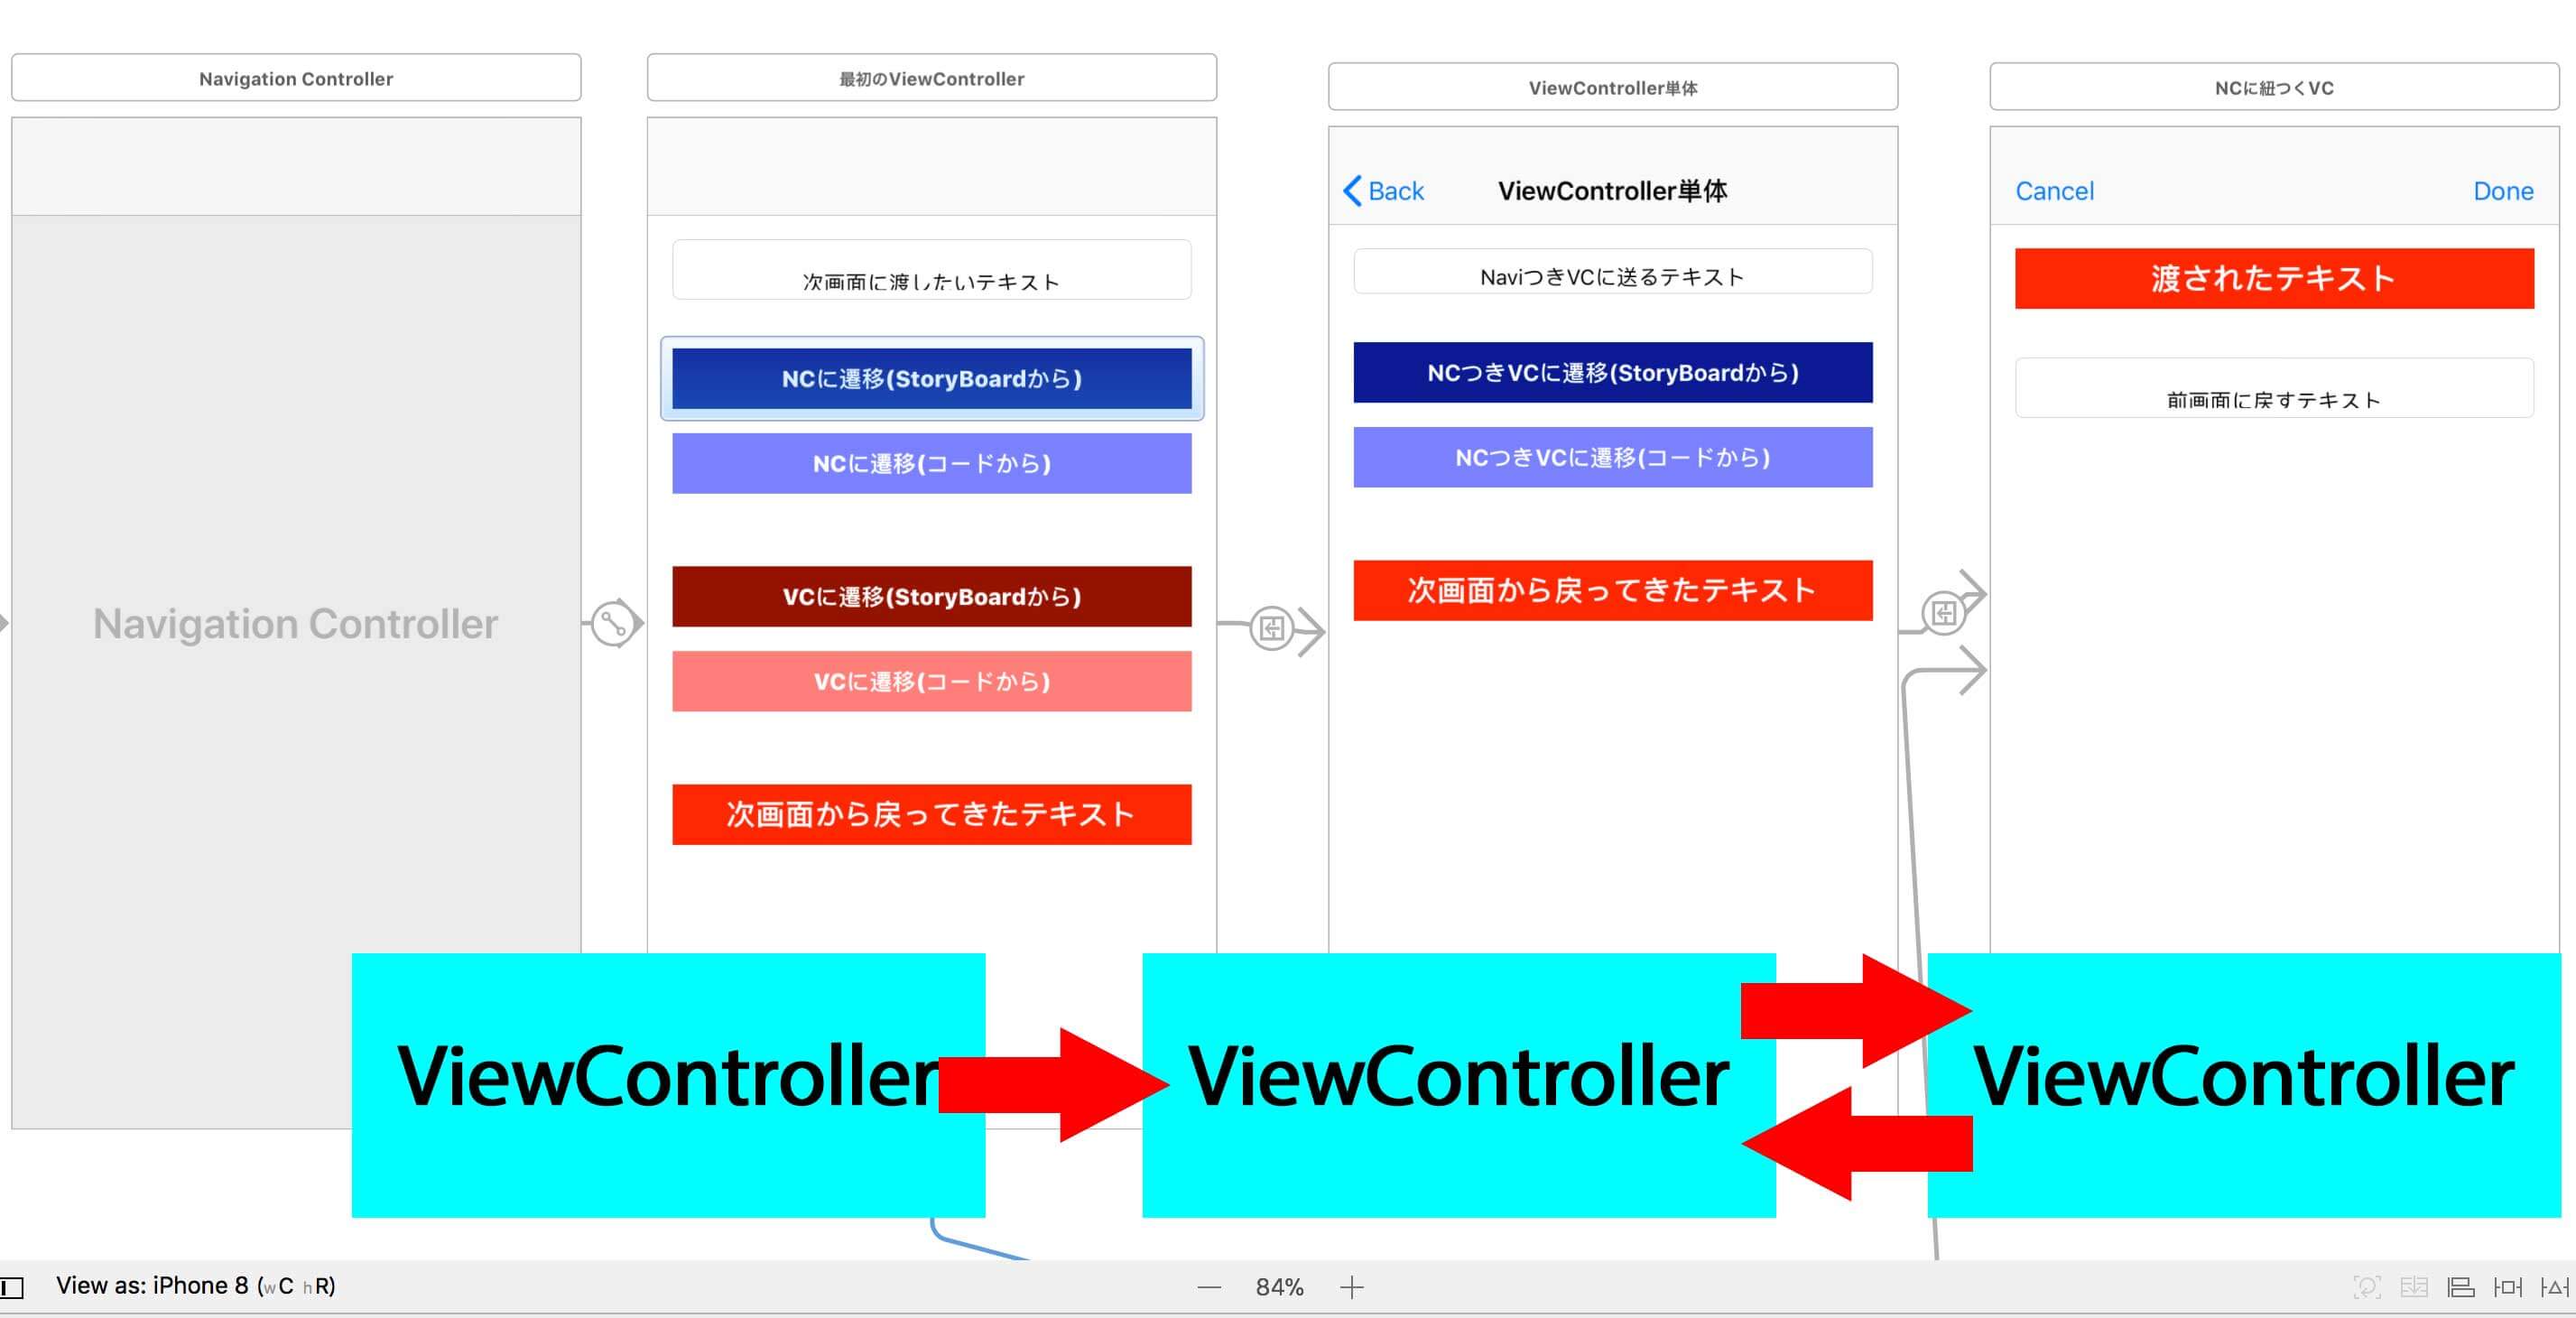
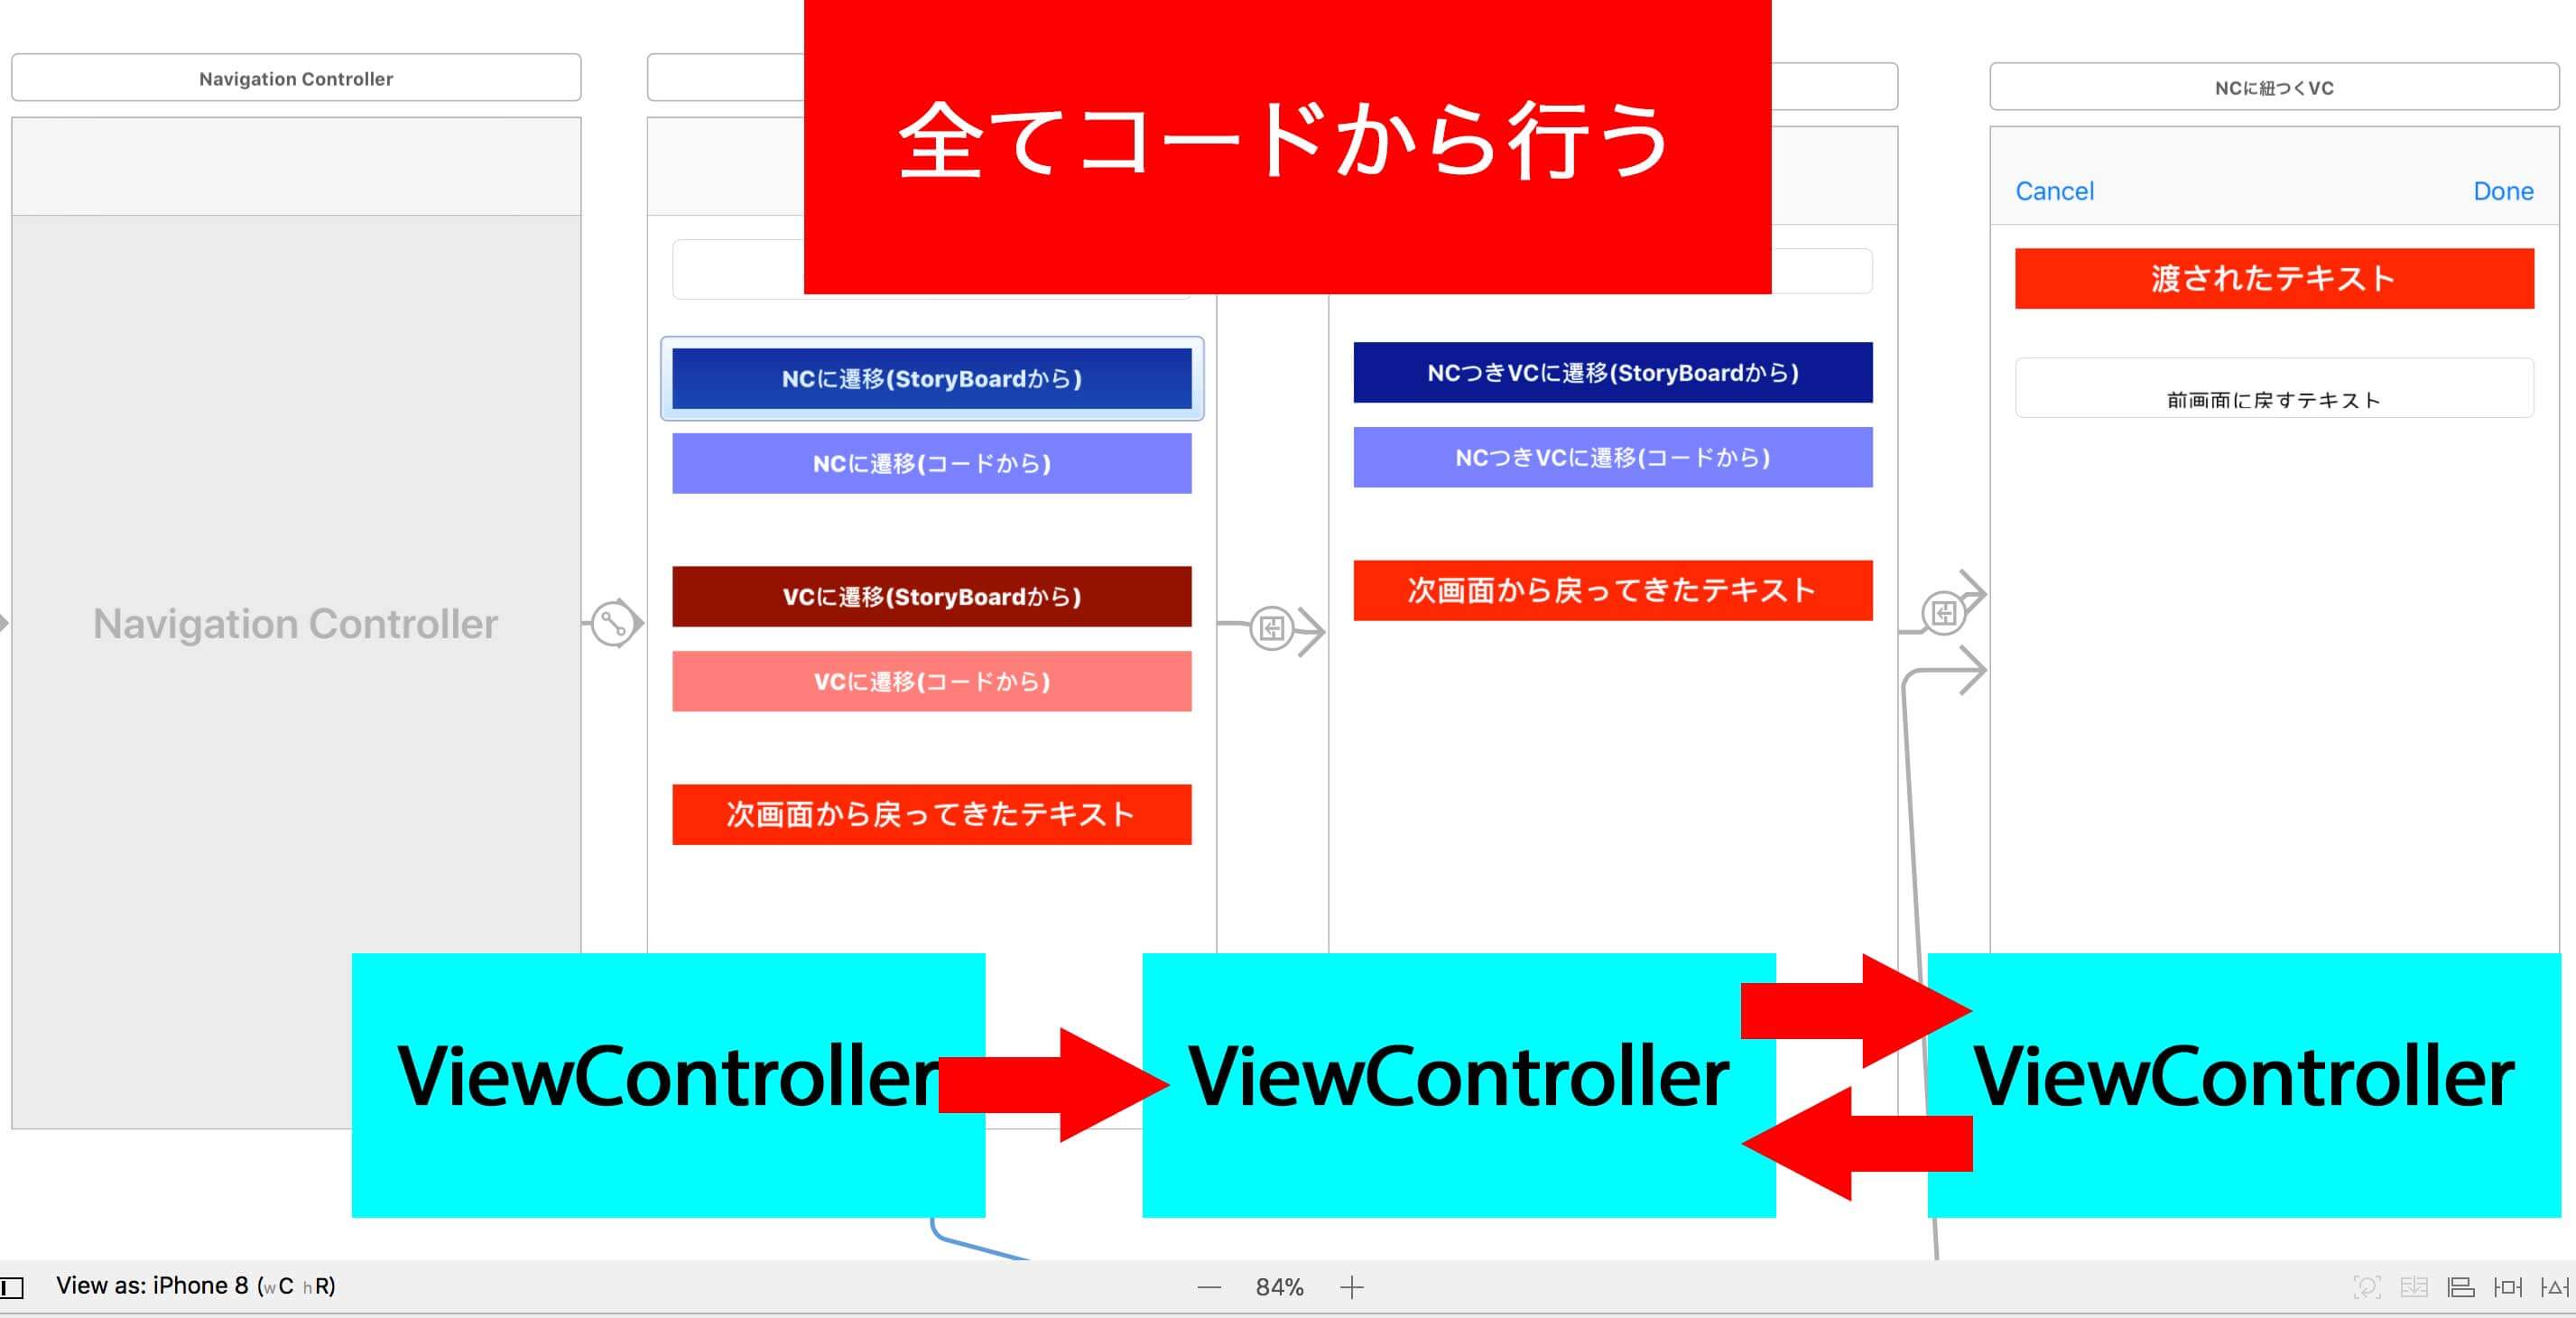
下記4つを説明する。
こちらの記事は当初運営者メンバーの執筆でしたが現在は離れており、寄稿記事となっています。そのため当記事の情報アップデートにつきましては2020年1月をもって終了・サポート・内容についての問合せなどは受けておりません。また、記事内容を利用された際に生じた内容にも責任を負えませんのでご了承ください。
- UINavigationControllerへの遷移(StoryBoardから)と値の受け渡し方/戻し方
- UINavigationControllerへの遷移(コードから)と値の受け渡し方/戻し方
- UIViewControllerへの遷移(StoryBoardから)と値の受け渡し方/戻し方
- UIViewControllerへの遷移(コードから)と値の受け渡し方/戻し方
UINavigationControllerへの遷移(StoryBoardから)と値の受け渡し方/戻し方
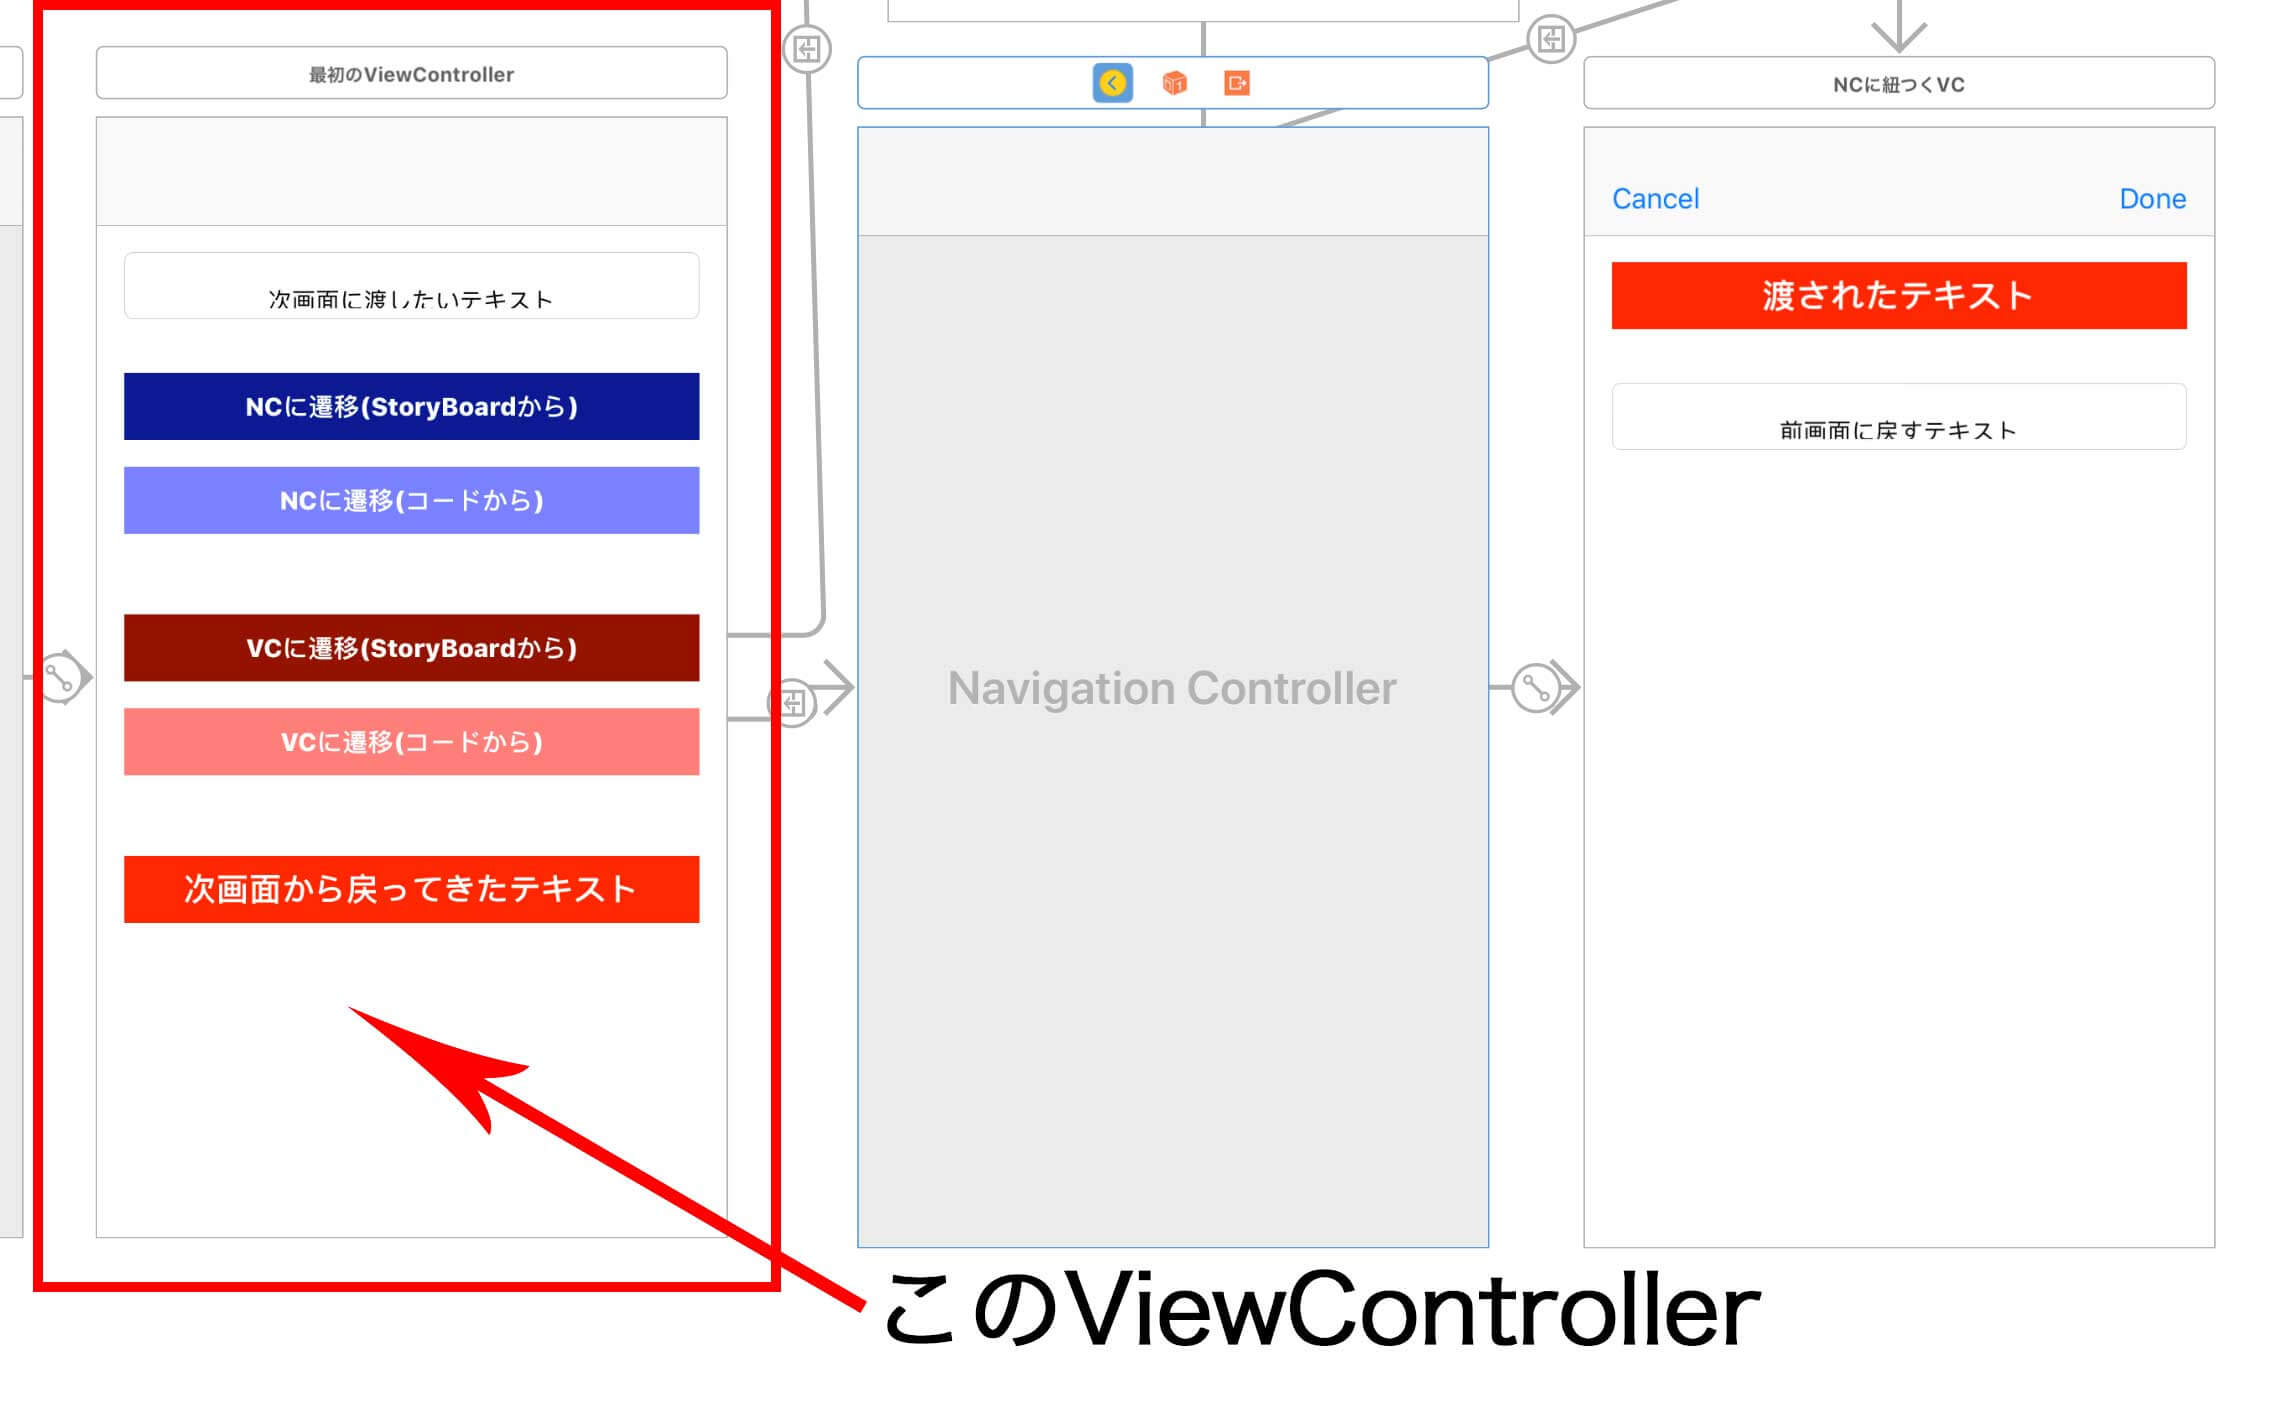
作りたい遷移はこの部分。
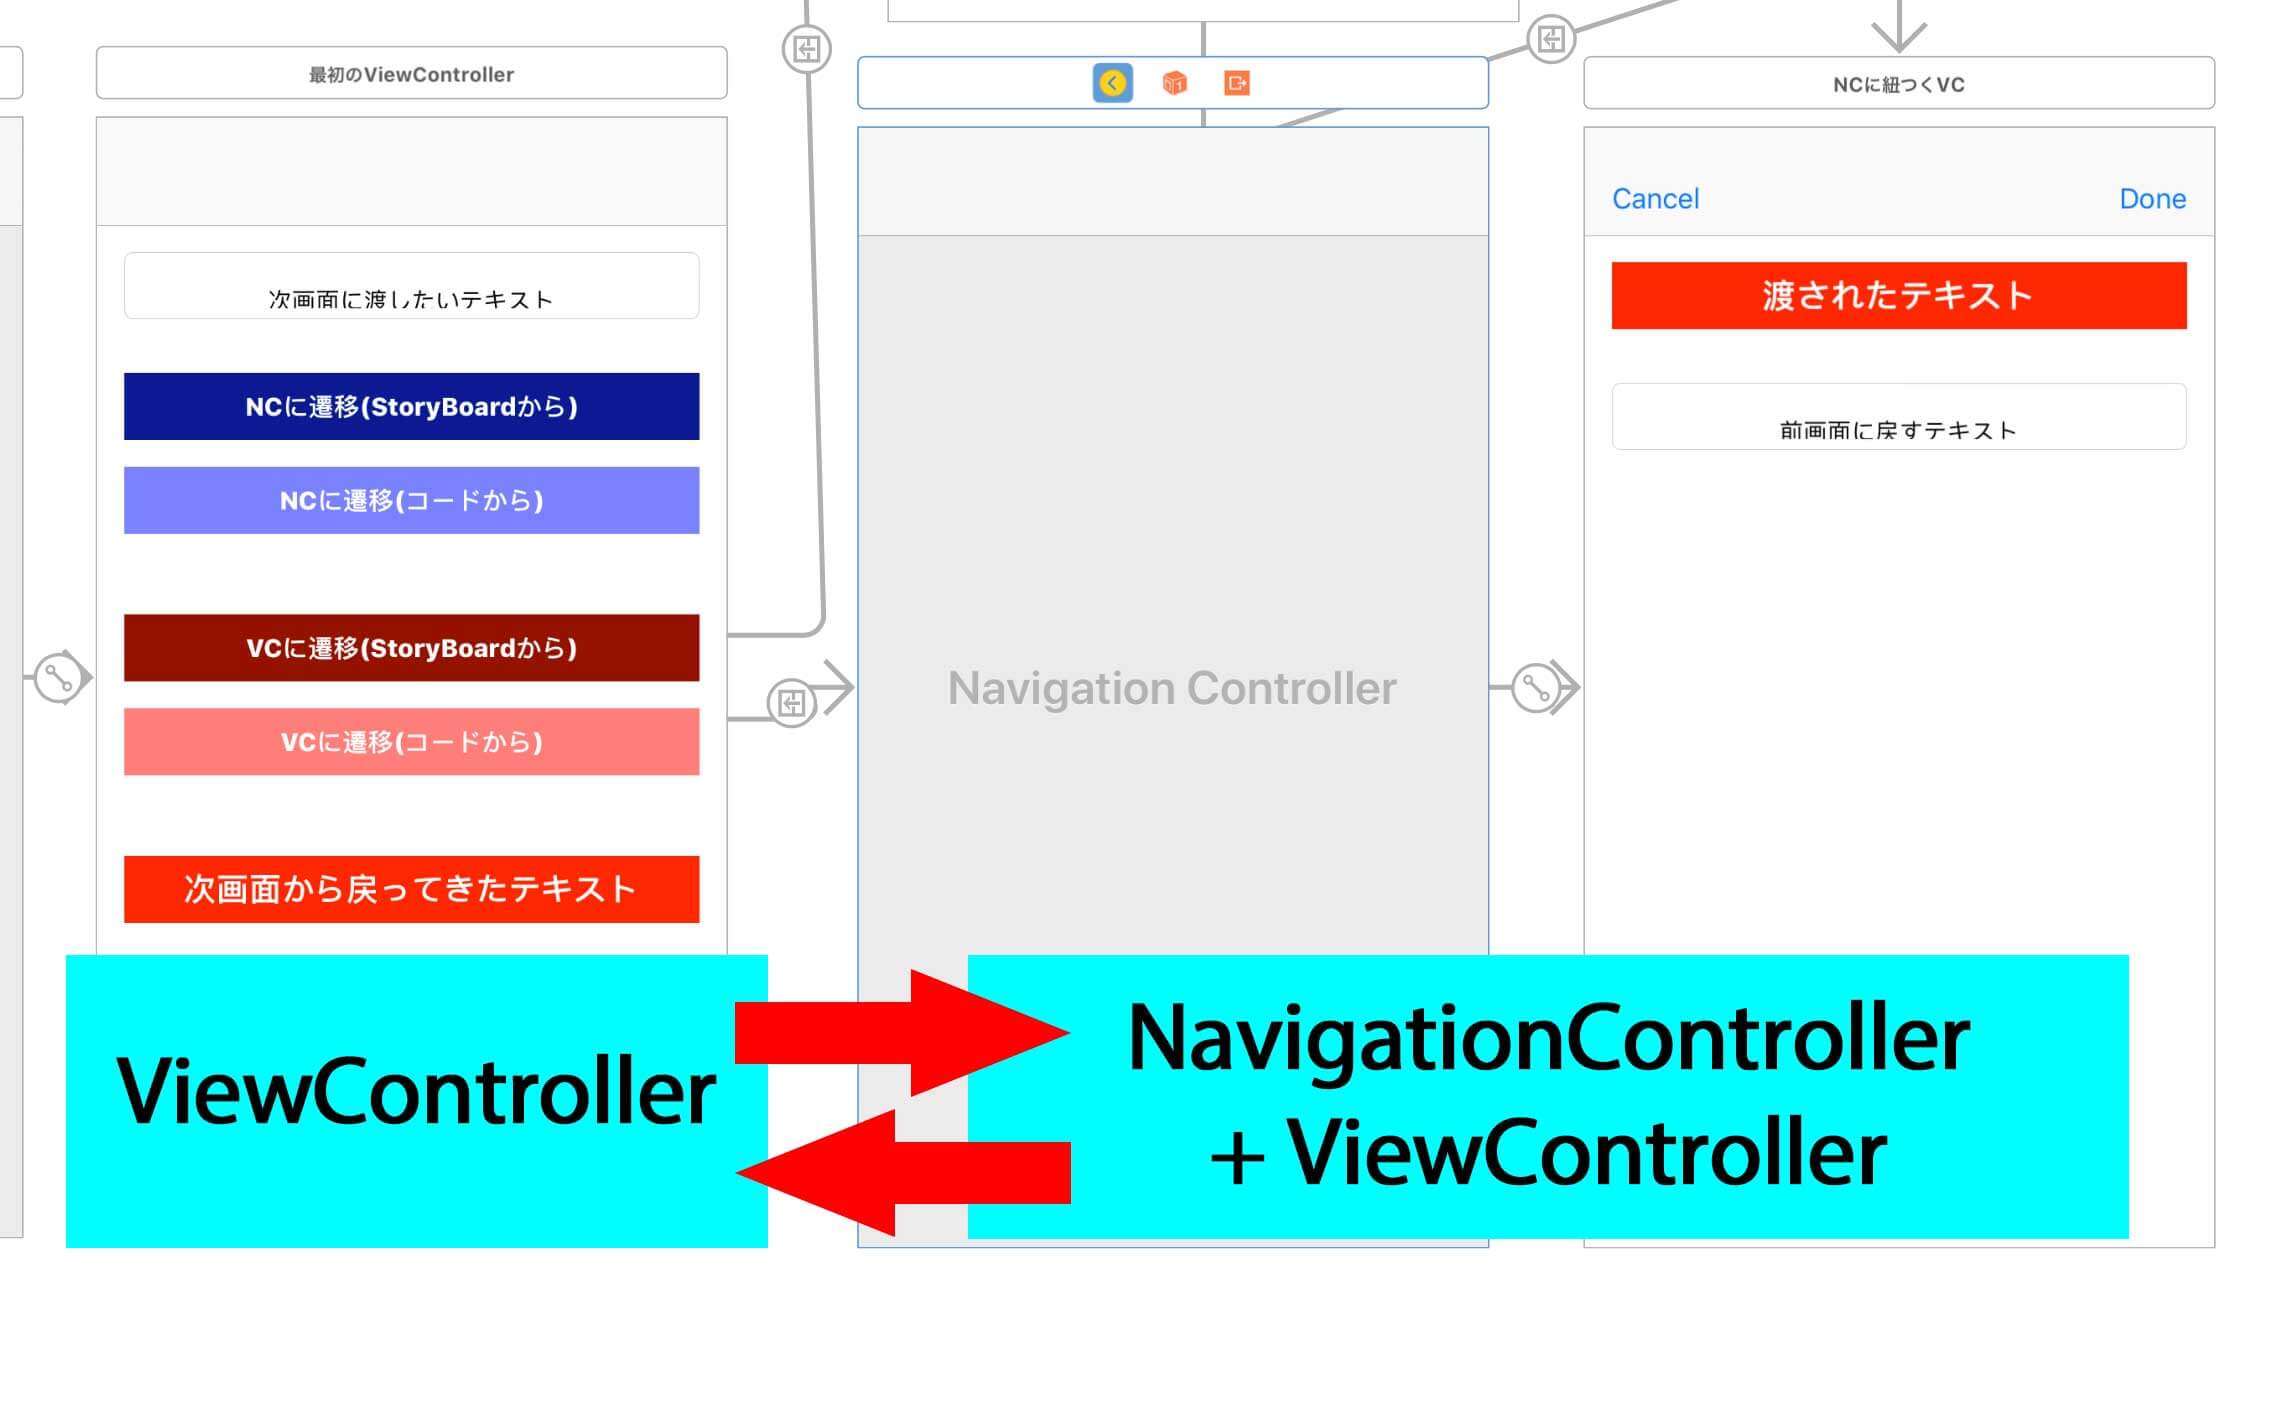
本章では、StoryBoardを使って、UINavigationControllerがついたViewControllerに値を渡して画面遷移し、値を元の画面に戻すまでをやる。下記の様な感じ。
まず値を渡して。
値を前画面に戻す。
それでは実装する。
次画面のUINavigationControllerへの矢印を引く(segue)
SegueのIdentifierを命名する
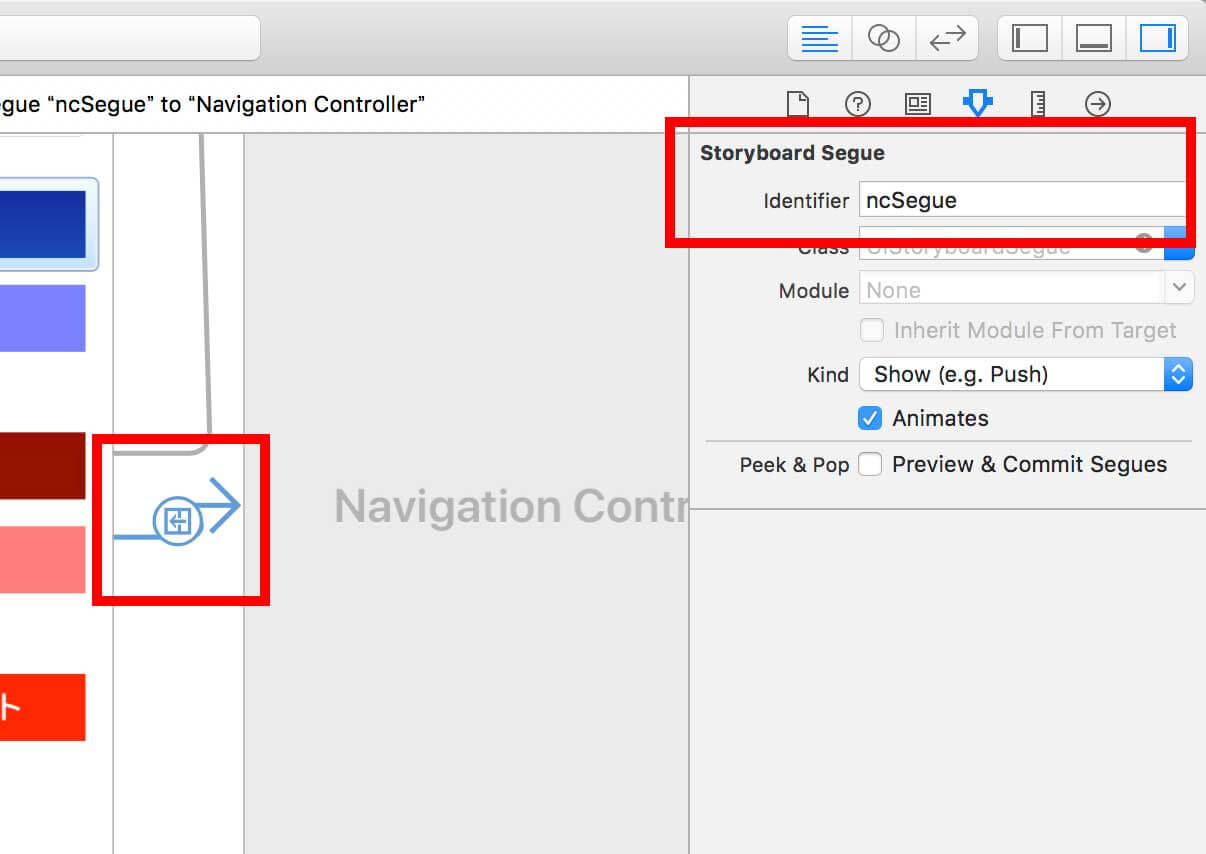
次画面のViewControllerに値がセットされる変数を書く

NavitukiViewController.swift
class NavitukiViewController: UIViewController {
    var receiveText:String? // 前画面からのテキストがここに入る
前画面のprepareで渡したい値を設定する
TopViewController.swift
    override func prepare(for segue: UIStoryboardSegue, sender: Any?) {
        guard let identifier = segue.identifier else {
            // identifierが取れなかったら処理やめる
            return
        }

        if(identifier == "ncSegue") {
            // NavigationControllerへの遷移の場合

            // segueから遷移先のNavigationControllerを取得
            let nc = segue.destination as! UINavigationController

            // NavigationControllerの一番目のViewControllerが次の画面
            let vc = nc.topViewController as! NavitukiViewController

            // 次画面のテキスト表示用のStringに、本画面のテキストフィールドのテキストを入れる
            vc.receiveText = self.sendingTextField.text
        }
    }
ここまでで、下記の様にNavigationControllerへ値を渡すことができる。
次画面から前画面に値を通知してやる
次は、前画面に値を戻してやる。
まずは「Done」ボタンが押された時のIBActionを設定する。
前画面の値を更新しつつ画面を閉じる
NavitukiViewController.swift
    @IBAction func done(_ sender: Any) {
        // 表示の大元がViewControllerかNavigationControllerかで戻る場所を判断する
        if self.presentingViewController is UINavigationController {
            //  表示の大元がNavigationControllerの場合
            let nc = self.presentingViewController as! UINavigationController

            // 前画面のViewControllerを取得
            let vc = nc.topViewController as! TopViewController

            // 前画面のViewControllerの値を更新
            vc.receivedTextLabel.text = self.returnTextField.text

            // 今の画面を消して、前画面を表示させる<span data-mce-type="bookmark" style="display: inline-block; width: 0px; overflow: hidden; line-height: 0;" class="mce_SELRES_start"></span>
            self.dismiss(animated: true, completion: nil)

        }
    }<span data-mce-type="bookmark" style="display: inline-block; width: 0px; overflow: hidden; line-height: 0;" class="mce_SELRES_start"></span>
キャンセルの場合に画面を閉じる処理
キャンセルボタンのIBActionを設定。
presentingViewControllerを使って、表示の大元を調べ、画面の消し方を変える。
NavitukiViewController.swift
    @IBAction func close(_ sender: Any) {
       // 表示元がViewControllerかNavigationControllerかで消し方が違う
        if self.presentingViewController is UINavigationController {
            //  表示元がNavigationControllerの場合 (★<span data-mce-type="bookmark" style="display: inline-block; width: 0px; overflow: hidden; line-height: 0;" class="mce_SELRES_start"></span>今回こっちを通る)
            self.dismiss(animated: true, completion: nil)
        } else {
            // 表示元がViewControllerの場合
            self.navigationController?.popViewController(animated: true)
        }
    }
UINavigationControllerへの遷移(コードから)と値の受け渡し方/戻し方
次にStoryBoardを使わず、コードからNavigationControllerへ遷移させてみる。

Button押下時のIBAction設定
UINavigationControllerをコードから起動。次画面に値を渡す
NavigationControllerのStoryBoard IDを設定。
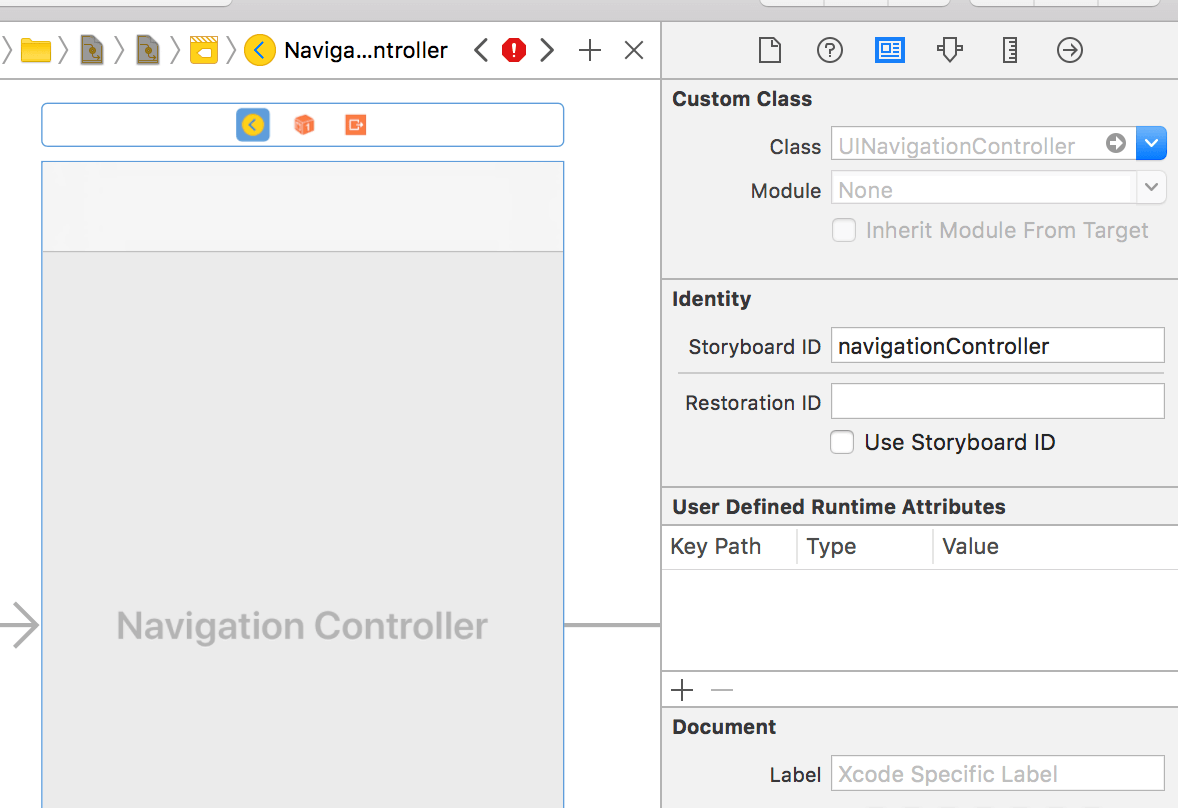
ボタンが押下されたときに開くNavigationControllerを指定して表示。値も渡す。
TopViewController.swift
    @IBAction func moveNC(_ sender: Any) {
        let storyboard: UIStoryboard = self.storyboard!
        // 設定したidentifier名でNavigationControllerを取得
        let nc = storyboard.instantiateViewController(withIdentifier: "navigationController") as! UINavigationController

        // NavigationControllerの一番目のViewControllerが次の画面
        let vc = nc.topViewController as! NavitukiViewController

        // 次画面のテキスト表示用ラベルのテキストを、本画面のテキストフィールドのテキストに
        vc.receiveText = self.sendingTextField.text

        // NavigationControllerを表示(NCのトップのViewControllerが表示される)
        self.present(nc, animated: true, completion: nil)
    }
次画面から前画面に値を渡す
UIViewControllerに遷移(StoryBoardから)と値の受け渡し方/戻し方
ViewControllerからViewControllerへStoryBoardで遷移し、値の受け渡しをする。
最終的にはこんな感じの動きになる。
最初の画面から次のViewControllerへsegueを設定
2番目の画面から3番目の画面に遷移させつつ、値もsegueで渡す
StoryBoardからsegueを設定。
Segueのidentifierを命名する。
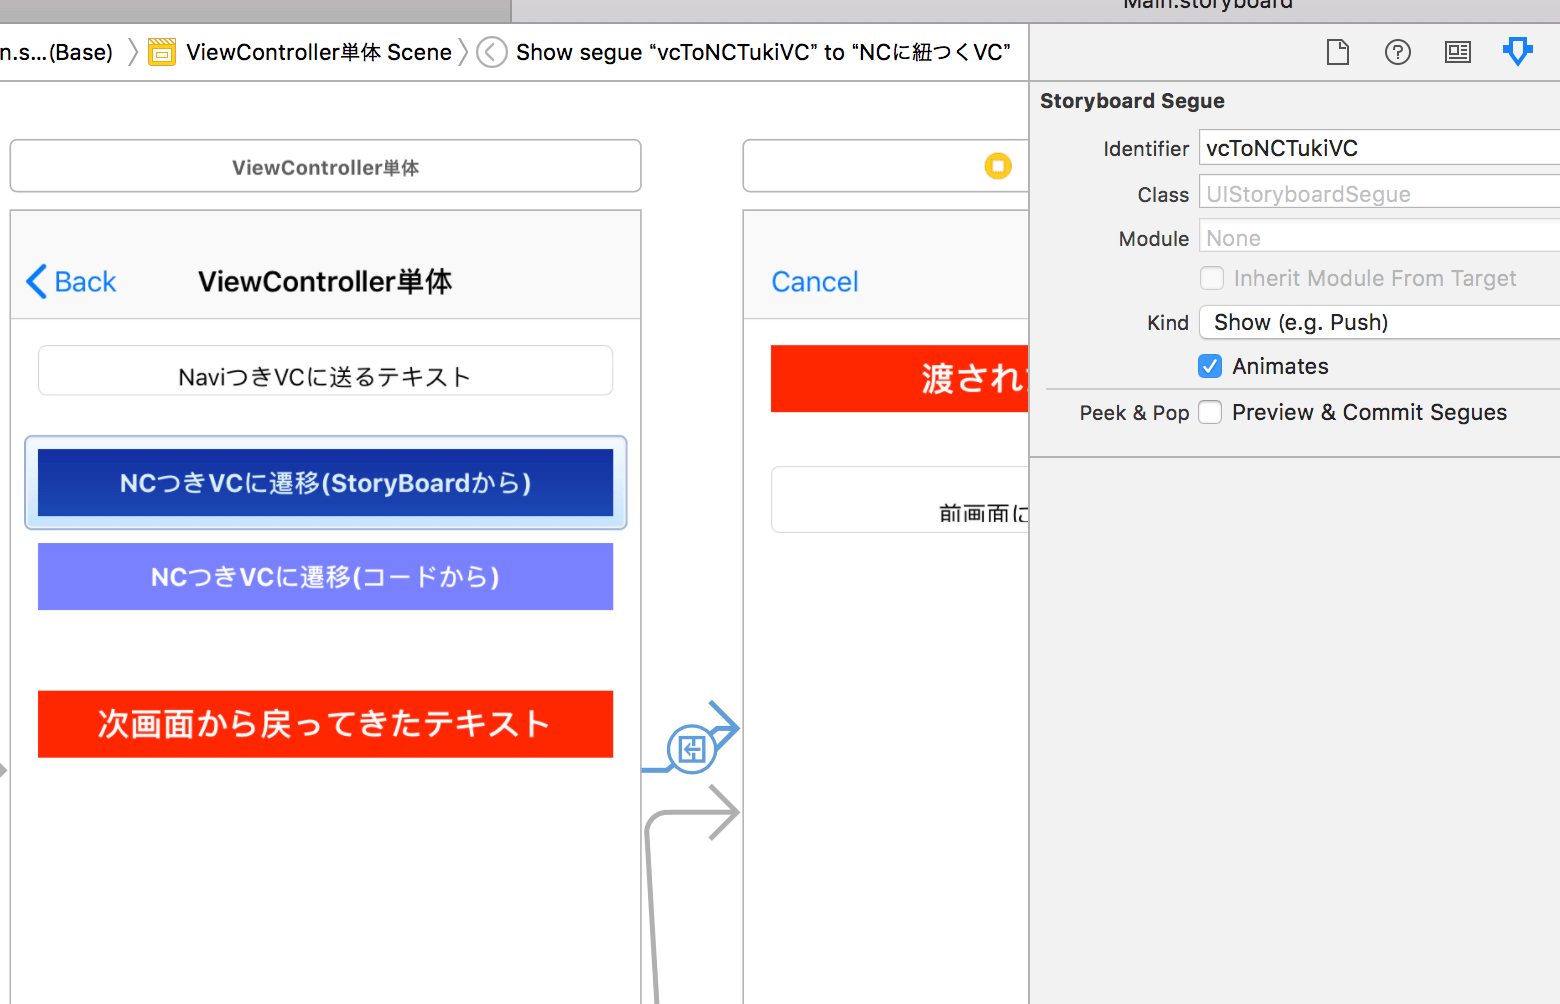
prepareで値を渡して、表示する。
SingleViewController.swift
    override func prepare(for segue: UIStoryboardSegue, sender: Any?) {
        guard let identifier = segue.identifier else {
            // identifierが取れなかったら処理やめる
            return
        }

        if(identifier == "vcToNCTukiVC") {
            // NCつきViewControllerへの遷移の場合

            // segueから遷移先のViewControllerを取得
            let vc = segue.destination as! NavitukiViewController

            // 次画面のテキスト表示用ラベルのテキストを、本画面のテキストフィールドのテキストに
            vc.receiveText = self.sendingTextField.text
        }
    }
次画面からCancelで前画面に戻る
presentingViewControllerで表示元のControllerが取得できる。
表示元がUIViewControllerなので、self.navigationController?.popViewController(animated: true)で消す。
NavitukiViewController.swift
    @IBAction func close(_ sender: Any) {
       // 表示元がViewControllerかNavigationControllerかで消し方が違う
        if self.presentingViewController is UINavigationController {
            //  表示元がNavigationControllerの場合
            self.dismiss(animated: true, completion: nil)
        } else {
            // 表示元がViewControllerの場合
            self.navigationController?.popViewController(animated: true)
        }
    }
次画面から前画面に値を戻す
presentingViewControllerで前の画面が何かを調べられる。前の画面がViewControllerだった場合の遷移を追加し、戻す値を設定してやる。
NavitukiViewController.swift
    @IBAction func done(_ sender: Any) {
        // 表示の大元がViewControllerかNavigationControllerかで戻る場所を判断する
        if self.presentingViewController is UINavigationController {
            //  表示の大元がNavigationControllerの場合
            let nc = self.presentingViewController as! UINavigationController
            let vc = nc.topViewController as! TopViewController
            vc.receivedTextLabel.text = self.returnTextField.text
            self.dismiss(animated: true, completion: nil)

        } else {
            // 表示元がViewControllerの場合
            // 前画面のViewControllerを取得
            let count = (self.navigationController?.viewControllers.count)! - 2
            let vc = self.navigationController?.viewControllers[count] as! SingleViewController
            vc.receivedTextLabel.text = self.returnTextField.text
            // 画面を消す
            self.navigationController?.popViewController(animated: true)
        }
    }
完成。
UIViewControllerへの遷移(コードから)と値の受け渡し方/戻し方
最後にUIViewControllerへの遷移と値の受け渡しをコードからやってみる。
最初の画面から次のViewControllerへ遷移
まず次の画面にStoryBoard IDを設定。
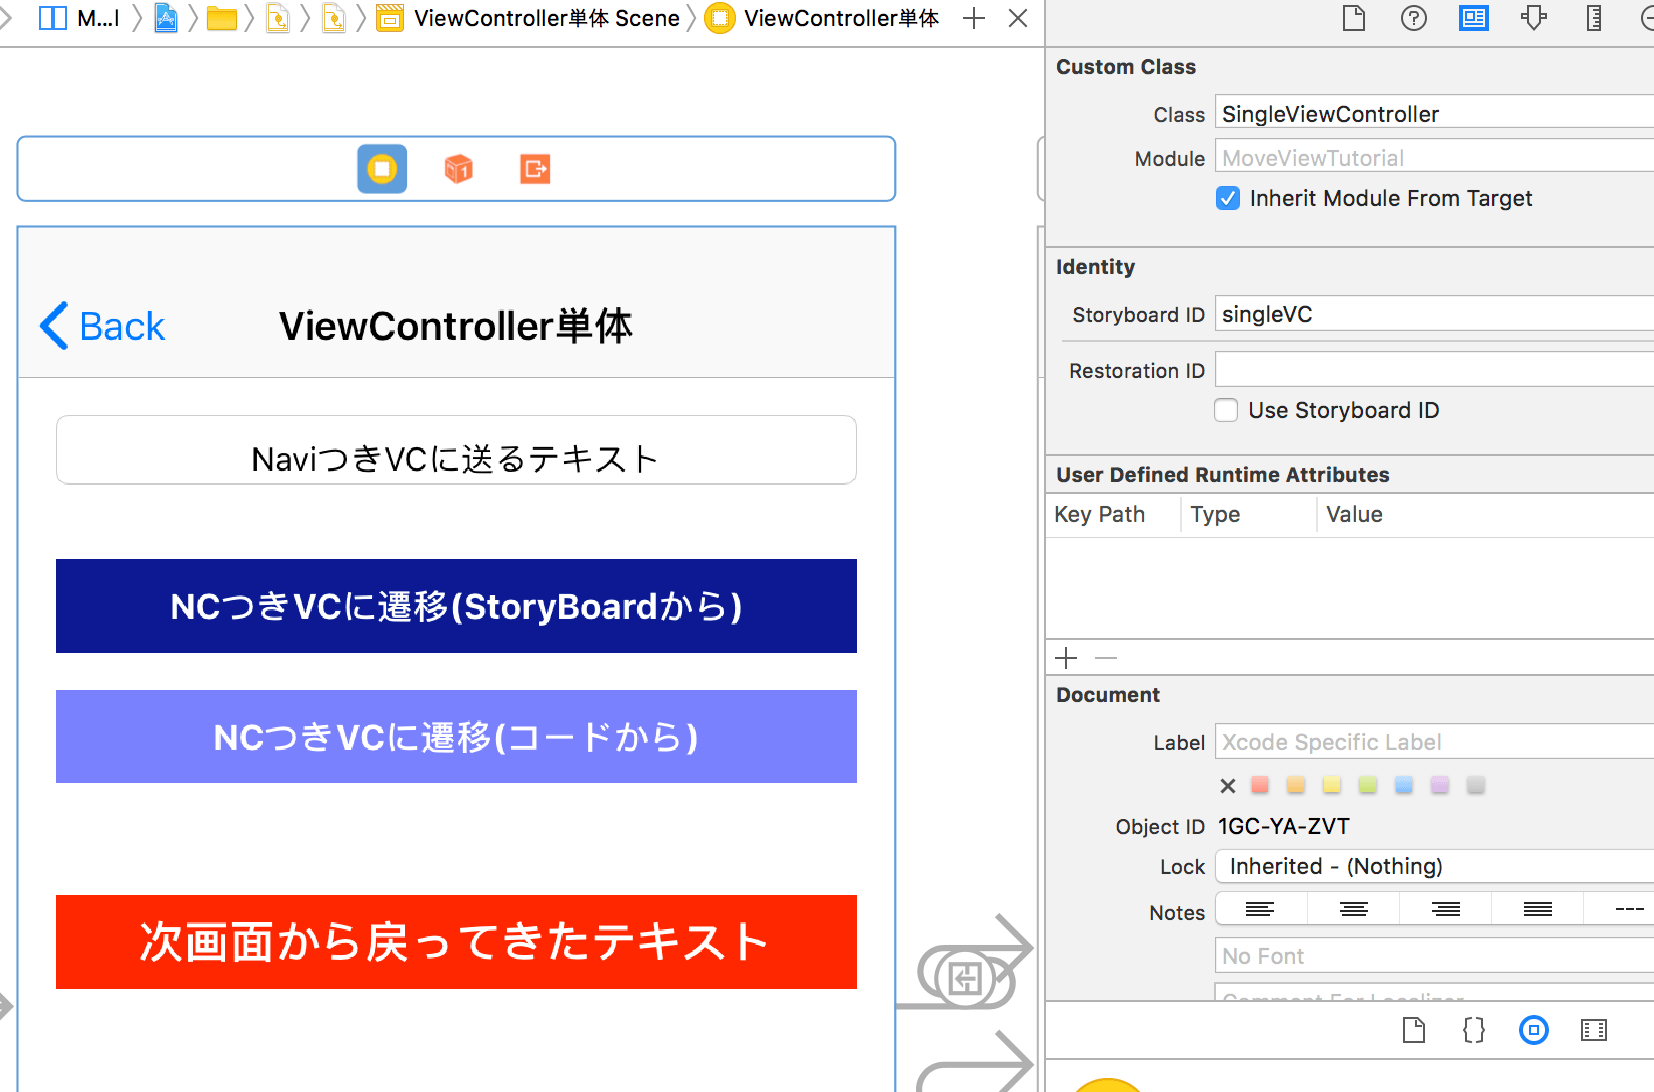
設定したStoryBoard IDを元にViewControllerを取得、遷移させる。
TopViewController.swift
    @IBAction func moveVC(_ sender: Any) {
        let storyboard: UIStoryboard = self.storyboard!
        // 設定したidentifier名で次画面のViewControllerを取得
        let vc = storyboard.instantiateViewController(withIdentifier: "singleVC") as! SingleViewController

        // 次画面のViewControllerを表示
        self.navigationController?.pushViewController(vc, animated: true)
    }<span data-mce-type="bookmark" style="display: inline-block; width: 0px; overflow: hidden; line-height: 0;" class="mce_SELRES_start"></span>
2番目のViewControllerから3番目のViewControllerに値を渡しつつ遷移
3番目のViewControllerにStoryBoard IDをつける。
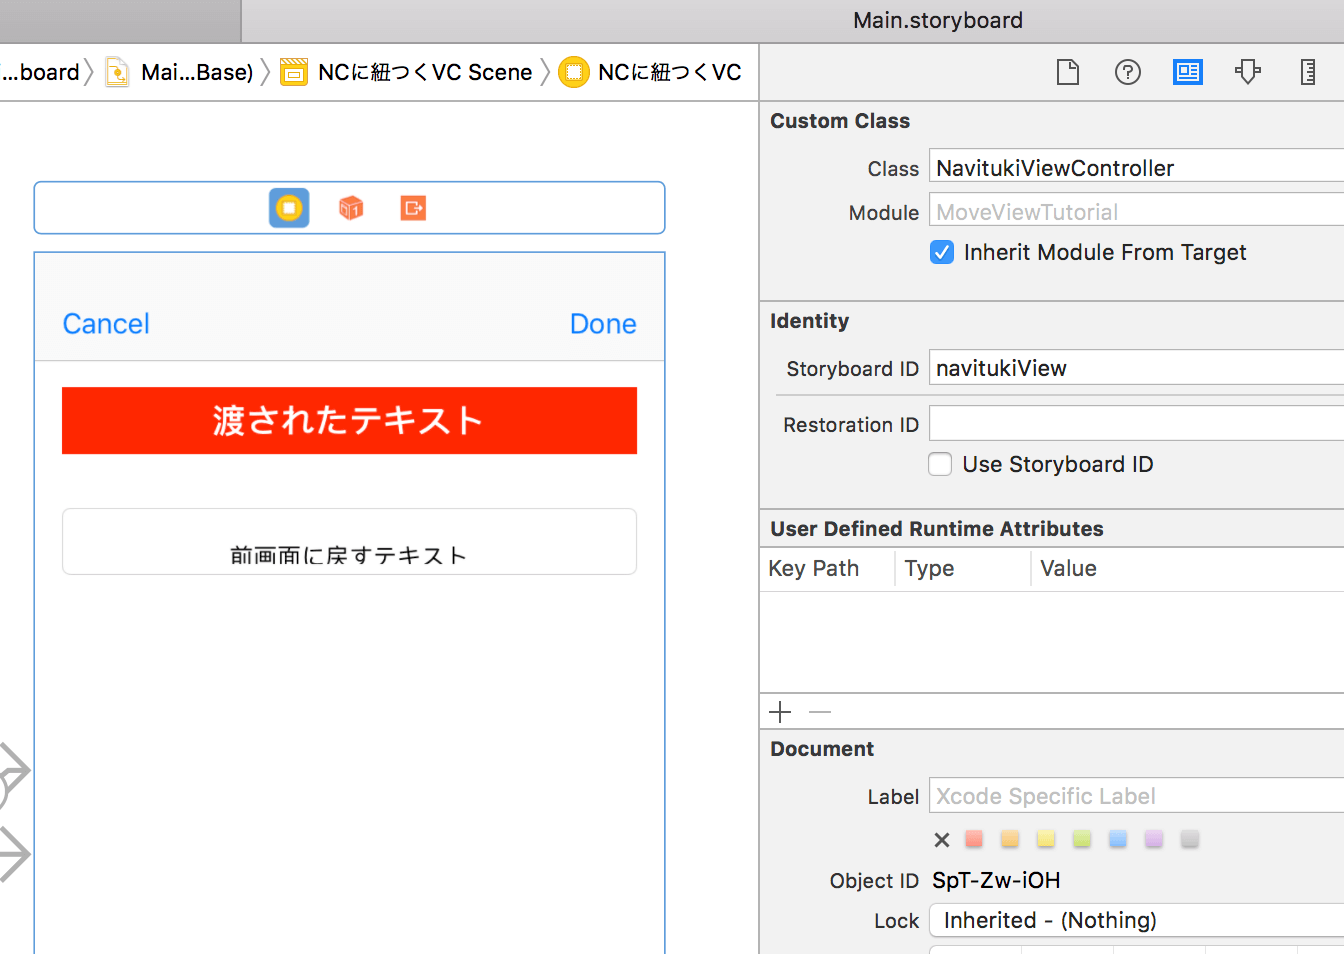
3番目のViewControllerに値を渡しつつ遷移する。
SingleViewController.swift
    @IBAction func moveNabitukiVC(_ sender: Any) {
        let storyboard: UIStoryboard = self.storyboard!
        // 設定したidentifier名で次画面のViewControllerを取得
        let vc = storyboard.instantiateViewController(withIdentifier: "navitukiView") as! NavitukiViewController

        // 次画面のテキスト表示用ラベルのテキストを、本画面のテキストフィールドのテキストに
        vc.receiveText = self.sendingTextField.text

        // 次画面のViewControllerを表示
        self.navigationController?.pushViewController(vc, animated: true)
    }
次画面から前画面に値を戻す
ポイント
- StoryBoardの遷移時の値の受け渡しにはsegueを使う。segueにidentifierをつけ、prepare時にidentifierにより処理を分岐させる
- コードからの遷移は、self.present、NavigationControllerが付いていれば self.pushViewController
- self.presentingViewControllerで起動元のViewControllerが取得できる。値を前画面に戻す時などによく使う
ソースコードはgithubにあるので、詳しくはそちらを試してみてほしい。
github:
https://github.com/yheihei/ios/tree/master/MoveViewTutorial